Resolve WooCommerce Stripe Webhook Errors at Checkout
A customer places an order, the payment clears on Stripe's end, yet your WooCommerce order stays stuck in "Pending Payment." Hours pass.
The encouraging news is that webhook errors follow predictable patterns. Once you understand what each HTTP status code means, where the authentication handshake can break, and how server-side infrastructure interferes with delivery, you can diagnose the problem methodically rather than guessing. Let us work through the full troubleshooting sequence together, from the simplest configuration checks to advanced CLI-based debugging.
Anatomy of a Failed Webhook: Decoding HTTP 401, 403, and 404 Status Codes
When Stripe needs to tell your WooCommerce store about a payment event — a successful charge, a failed attempt, a refund — it sends an HTTP POST request to a specific URL on your server. Depending on what goes wrong at your end, Stripe receives a status code back. That single three-digit number tells you exactly which layer of the system is misbehaving.
HTTP 404 — Not Found. This is the most straightforward case. Stripe is sending the event to a URL that simply does not exist on your server. Usually, the webhook endpoint URL in your Stripe Dashboard is misspelled, outdated, or still pointing at a staging domain you decommissioned weeks ago. The correct endpoint for the WooCommerce Stripe Payment Gateway follows this pattern:
`https://yourdomain.com/?wc-api=wc_stripe`
If you recently migrated your site, switched from HTTP to HTTPS, or changed your permalink structure, this URL may be stale in your Stripe settings. Consequently, every event Stripe attempts to deliver bounces back with a 404, and WooCommerce never hears about any of them.
HTTP 401 — Unauthorized. A 401 response signals an authentication failure. Stripe signs every webhook payload with a secret key, and your WooCommerce plugin verifies that signature before processing the event. When the Webhook Signing Secret in your WooCommerce settings is missing, empty, or mismatched with the one in your Stripe Dashboard, the plugin rejects the request as unverified. The request arrived at the right URL, but WooCommerce does not trust it.
HTTP 403 — Forbidden. A 403 means the request reached your server, but something blocked it before it could ever touch WordPress. This is the trickiest status code to troubleshoot because the endpoint URL is correct, the signing secret may be perfectly fine — yet the problem lives entirely in the network layer. Server-level firewalls, security plugins like Wordfence or Sucuri, or hosting providers that restrict incoming POST requests to certain paths are the usual offenders.
A webhook returning 403 does not mean your Stripe configuration is wrong. It means your server is actively refusing the connection before WordPress even gets involved. The distinction matters because it changes where you look for the fix.
Verifying Endpoint Configuration and Secret Keys in WooCommerce Settings
Let us start with the foundational check: confirming that both sides of the Stripe–WooCommerce conversation agree on the endpoint details.
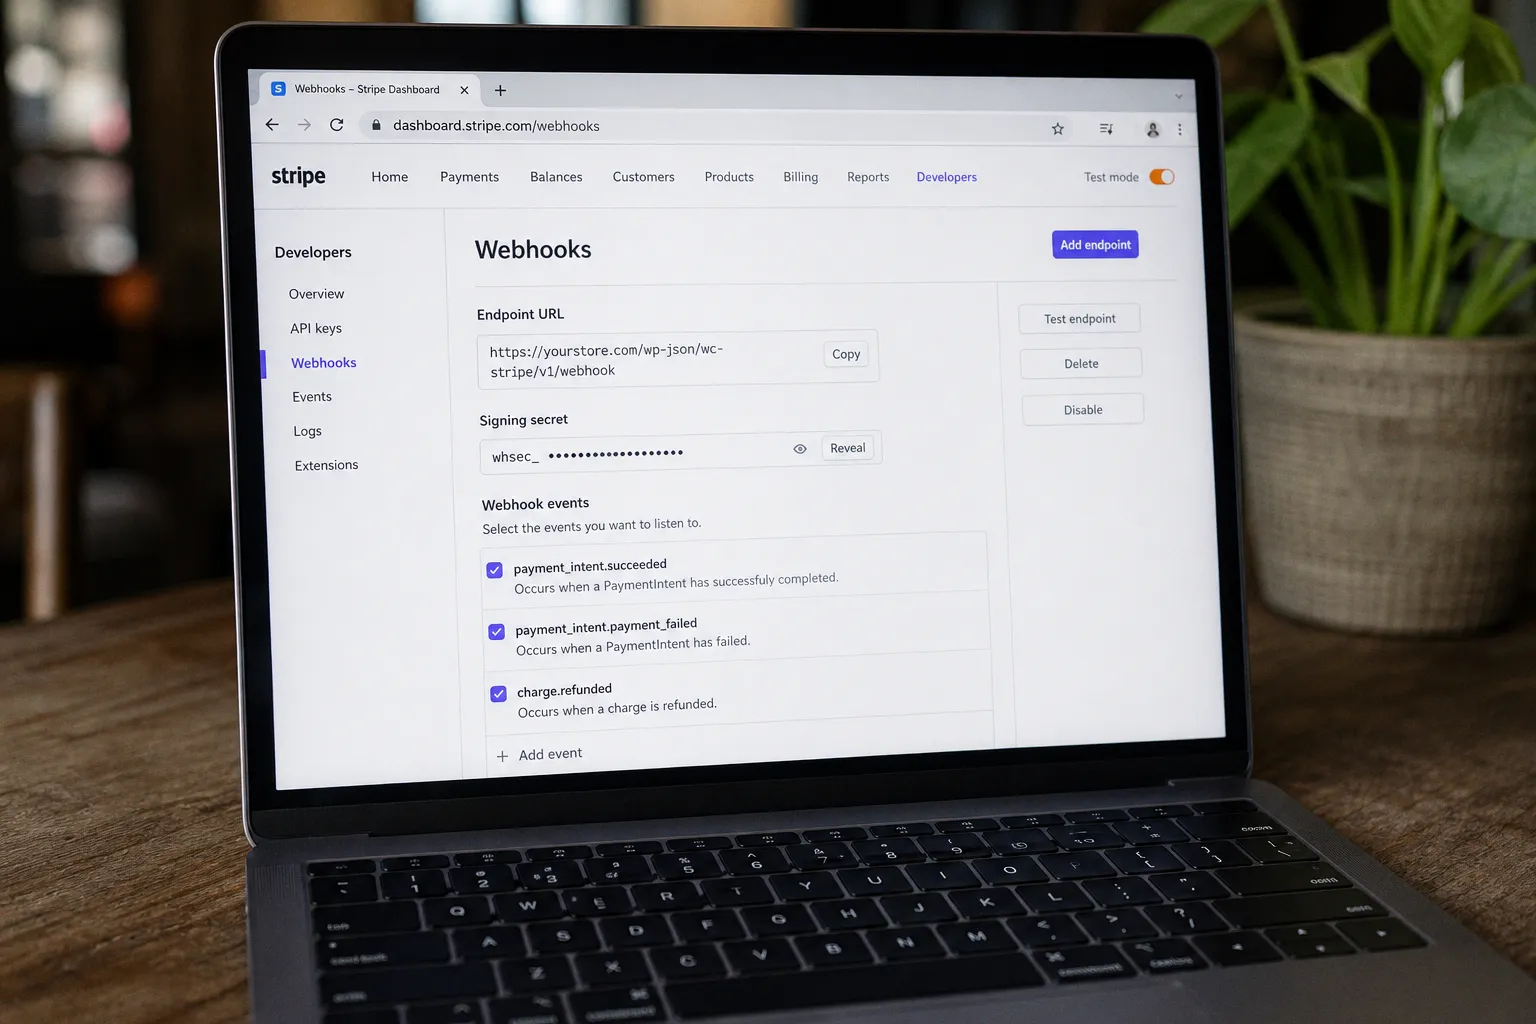
In the Stripe Dashboard, navigate to Developers → Webhooks. Locate the endpoint associated with your WooCommerce store and click into its details. Two things deserve your immediate attention:
1. The endpoint URL — does it match your current live domain exactly, including the `https` protocol and the `?wc-api=wc_stripe` suffix? Even a trailing slash difference can cause a mismatch.
2. The Signing Secret — this is the string beginning with `whsec_`. Copy it; you will need it in the next step.
If no webhook endpoint exists at all, you will need to create one. Click "Add endpoint," paste the correct URL, and select the events your store requires. We will cover exactly which events matter in the following section.
In WooCommerce, head to WooCommerce → Settings → Payments → Stripe. Depending on the version of the Stripe plugin you are running, the settings panel may also live under a dedicated Stripe tab in the admin sidebar. Look for a field labeled "Webhook Secret" or "Webhook Signing Secret." Paste the `whsec_` value you copied from the Stripe Dashboard into this field and save your changes.
Here is a mistake that causes an enormous amount of confusion: pasting the API Secret Key (the `sk_live_` value used for outbound API calls) into the Webhook Secret field. These are two distinct keys serving two distinct purposes. The Secret Key authenticates your server when it talks to Stripe; the Webhook Secret authenticates Stripe when it talks to your server. Using one in place of the other produces 401 errors that are remarkably difficult to trace, because everything else looks correct.
Always confirm you have pasted the Webhook Signing Secret (`whsec_...`) — not the API Secret Key (`sk_live_...`) — into WooCommerce. Mixing up these two keys is the single most common cause of persistent 401 errors across WooCommerce Stripe installations.
After saving, return to the Stripe Dashboard and open the "Attempts" tab for your webhook endpoint. Click "Send test webhook" (Stripe provides this button directly in the interface) and verify that the response code is now HTTP 200. If it is, the authentication handshake is working and you can move on. If the test still returns 401, double-check for whitespace characters accidentally copied along with the secret key — a trailing space at the end of the `whsec_` string is enough to cause a mismatch.
Essential Webhook Events for Order Synchronization
Even when the endpoint is configured correctly and authentication passes, your orders can still fall out of sync if you have not subscribed to the right event types. The WooCommerce Stripe gateway depends on a specific set of Stripe events to update order statuses automatically after checkout.
The three events that form the foundation of a standard checkout flow are:
- `payment_intent.succeeded` — Stripe confirms that the customer's payment has completed successfully. WooCommerce uses this event to transition the order from "Pending Payment" to "Processing" (or "Completed" for virtual and downloadable products).
- `payment_intent.payment_failed` — The customer's card was declined, or the payment attempt failed for another reason. WooCommerce marks the order as "Failed" and, depending on your settings, may send the customer a notification encouraging them to retry with a different payment method.
- `charge.refunded` — You issue a refund from the Stripe Dashboard rather than from within WooCommerce itself. This webhook notifies WooCommerce, which then updates the order status to "Refunded" and adjusts inventory counts accordingly.
For stores using WooCommerce Subscriptions, you will also need events such as `invoice.paid`, `invoice.payment_failed`, and `customer.subscription.deleted`. However, for a straightforward product store, the three events above are the essential foundation.
In your Stripe Dashboard webhook configuration, verify that all three events appear in the endpoint's subscribed event list. If you created the endpoint through the automatic setup in WooCommerce's Stripe settings panel, they should be subscribed by default. If you created the endpoint manually in Stripe, you may have selected individual events — take a moment to confirm that none of the critical three are missing.
One further nuance worth your attention: Stripe periodically updates its event schema and introduces new event versions. If your WooCommerce Stripe plugin is significantly outdated, it may not parse newer event payloads correctly, even when delivery is successful. Keeping the plugin current is not merely a security best practice — it is a functional requirement for reliable webhook processing.
Bypassing Server-Side Obstacles: Whitelisting Stripe IPs and Managing Firewall Restrictions
This is where troubleshooting moves beyond the WordPress admin panel and into your hosting environment — and it is precisely where many store owners get stuck, because the WooCommerce logs show nothing useful at all.
When your server returns a 403 to Stripe, the webhook never reaches WordPress. Consequently, WooCommerce has no record of the failed delivery, and the Stripe Dashboard may show the endpoint as "failing" without any helpful diagnostic detail on the WordPress side. You are left staring at two systems that each insist the other is the problem.
Security plugins are a frequent source of 403 blocks. Wordfence, Sucuri, iThemes Security, and comparable tools monitor incoming POST requests and may flag webhook payloads as suspicious, especially when they originate from unfamiliar IP addresses. The recommended approach is emphatically not to disable these plugins — they protect your store from genuine threats — but to whitelist Stripe's published IP ranges.
Stripe maintains a list of IP addresses used for webhook delivery. Add these IPs to your security plugin's allowlist. In Wordfence, this setting lives under Firewall → Allowlisted URLs and IP addresses. In Sucuri, navigate to Settings → Security → Whitelist. The specific steps differ by plugin, but the underlying principle is the same: instruct the security layer that requests originating from Stripe's infrastructure are legitimate and should pass through.
Hosting-level firewalls operate independently of any WordPress plugin. Managed hosting providers like Cloudways, Kinsta, WP Engine, and SiteGround all implement server-side security layers that may block incoming webhooks before they reach your WordPress installation. If whitelisting Stripe IPs inside your security plugin does not resolve the issue, contact your hosting support team and ask them to:
1. Confirm whether their server-level firewall is blocking POST requests to the `/?wc-api=wc_stripe` path
2. Whitelist Stripe's published IP ranges at the infrastructure level
3. Check for mod_security rules that may be triggering specifically on webhook payloads
Caching layers present a subtler and often-overlooked problem. Certain hosting configurations cache all requests hitting the WordPress front end, including API endpoints. If a cached response is served to Stripe instead of passing the request through to PHP and WordPress, the webhook will technically succeed (often returning HTTP 200) but produce no actual processing on the WooCommerce side. The order status remains unchanged, and you may not notice the problem until a significant number of orders are affected.
Ensure that paths matching `/?wc-api=` are excluded from page caching. Most managed hosting dashboards allow you to configure cache exclusions directly, or you can request the change through a support ticket.
When webhooks fail with no WooCommerce-side logs, the problem is almost always outside WordPress — in server firewalls, security plugins, or aggressive caching rules. Check your server access logs for Stripe's incoming requests before anything else.
Advanced Debugging: Using Stripe CLI to Simulate and Trace Event Delivery
If the steps above have not isolated the issue, the Stripe Command Line Interface — commonly called the Stripe CLI — becomes your most powerful diagnostic tool. It allows you to simulate webhook events from your local or staging environment, bypassing DNS complexities and SSL certificate issues that can cloud production debugging.
Setting up the Stripe CLI. Download and install the CLI from Stripe's developer documentation. Once installed, authenticate with your Stripe account by running:
`stripe login`
A browser window opens for authentication. After logging in, forward events to your local WooCommerce instance:
`stripe listen --forward-to localhost:8000/?wc-api=wc_stripe`
Replace `localhost:8000` with your local development URL. The CLI generates a temporary webhook signing secret — a `whsec_test_` value. Paste this into your WooCommerce Stripe settings for the duration of the test session, replacing the production secret temporarily.
Triggering specific test events. With the listener running, open a second terminal window and fire off individual events:
- `stripe trigger payment_intent.succeeded` simulates a completed payment
- `stripe trigger payment_intent.payment_failed` simulates a declined card
- `stripe trigger charge.refunded` simulates a refund issued from the Stripe side
Watch the CLI output carefully. It displays the full event payload, the URL it forwarded to, and the HTTP response code from your local server. If WooCommerce processes the event correctly, you will see an HTTP 200 response and the corresponding order status change appear in your WooCommerce dashboard in real time.
Interpreting failures. A 401 response from the CLI means the temporary `whsec_test_` value does not match what WooCommerce expects — revisit the Webhook Secret field and confirm the paste was clean. A 403 response points to a local security plugin or development server configuration blocking the request, which mirrors the production problem you may be investigating. A 404 suggests a routing issue: WordPress is not recognizing the `wc-api` query parameter, which can happen when permalink settings are corrupted or another plugin is rewriting URLs unexpectedly.
For maximum diagnostic visibility, enable WordPress debug logging alongside the CLI. Add the following to your `wp-config.php` file:
`define( 'WP_DEBUG', true );`
`define( 'WP_DEBUG_LOG', true );`
This captures granular error output from the WooCommerce Stripe plugin in the `wp-content/debug.log` file, giving you the internal perspective that the Stripe Dashboard alone cannot provide.
Wrapping Up: What You Have Achieved and What Comes Next
You now have a complete diagnostic path for resolving WooCommerce Stripe webhook errors. Start by verifying the endpoint URL and signing secret on both the Stripe and WooCommerce sides. Confirm that the three essential event types — `payment_intent.succeeded`, `payment_intent.payment_failed`, and `charge.refunded` — are subscribed. Check for firewall and security plugin blocks by whitelisting Stripe's IP ranges, and rule out caching interference with the `wc-api` path. When the production environment proves difficult to debug, fall back to the Stripe CLI for controlled, repeatable testing.
These steps resolve the vast majority of webhook failures across WooCommerce stores of every size and niche. Whether you are running a sports merchandise shop, a digital downloads marketplace, or a subscription box service — reliable webhook delivery is not optional infrastructure. It is the backbone of your order fulfillment pipeline, and neglecting it means orders, refunds, and inventory silently falling out of alignment.
For stores processing significant volume, consider enabling Stripe's built-in webhook monitoring alerts. The Dashboard lets you configure email notifications when endpoint failures exceed a threshold you define. Catching a degrading webhook early — before it affects dozens of orders — is always preferable to discovering the problem through a wave of customer complaints.